How to prepare VMWare ESX4i server for installation of Oracle RAC 11gR2 Grid Infrastructure
configure NTP for the ESX server
Time synchonization is essential in particular between RAC nodes.
The ESX server has an option to allow virtual machines to synchronize the time with the ESX host they are running on.
NTP should be configured into the guest OS in addition to this.
Th configure the ESX server:
- click Properties to display the NTP Daemon (ntpd) Options dialog box
- click NTP settings
- click Add to add NTP servers
- click General
- for the Startup Policy, select „Start and stop with host“
- click OK
configure ESX host networking
create a new virtual switch in the ESX server settings
Navigate to section „Configuration/Networking“ in the VMWare vSphere client to configure the ESX server.
The virtual switch is dediced for the RAC interconnect.
If both RAC nodes are located in the same ESX server (e.g. for test purposes), it can be configured without any physical interface.
configure virtual machines for two RAC nodes
for OEL, configure E1000 network cards (VMNET3 has CPU load issues)
configure 2 ethernet adapters per node
configure shared disks
For Oracle Grid Infrastructure, we need voting disks and a CRS repository.
It is recommended to use ASM for shared storage in 11gR2.
Since 11gR2, it is possible and recommended to store the CRS repository together with voting disks in one ASM disk group, called +GRID.
To build this ASM disk group later, we need some shared storage devices.
Further shared storage is needed later for data storage itself.
For redundance, we need at least 2 copies of the cluster repository.
To use it as voting disks, we need an odd number of devices.
Hance, we need at least 3 shared disks for the +GRID ASM disk group, plus the disks for shared data storage.
create hard disks in shared disk directory
add a new harddisk to machine
- in vSphere client, select a virtual machine
- right-click the name of the virtual machine and select „Edit Settings“ to display the Virtual Machine Properties pane
- click Add to display the „Add Hardware“ wizard
- in the „Add Hardware“ wizard select „Hard Disk for the Device Type“, and click „Next“
- in the „Disk“ section of the „Select a Disk“ page, select „Create a new virtual disk“
- set disk size to 5 GB
- select the „Support clustering features such as Fault Tolerance“ check box, and select CRS1 to specify a datastore. Also, for vSphere 5, in the Disk Provisioning section select Thick Provision Eager Zeroed.
- click Next.
- on the „Compatibility Mode“ page, click „Next“.
- on the „Advanced Options“ page, in the „Virtual Device Node“ section, select SCSI (1:0).
- in the „Mode“ section, select „Independent“. Click Next.
- on the „Ready to Complete“ page, click „Finish“.
- click „OK“.
delete it from machine
move the new hard disks .vdmk files to shared directory on datastore
- login to the ESX console via ssh
- (optionally) create a new directory for shared storage
- rename the disk file (optional)
You may want to rename the disk files to give it a name corresponding to the new disk funktionality.
After renaming them, the .vmdk file has to be edited to point to the new #flat.vmdk file.
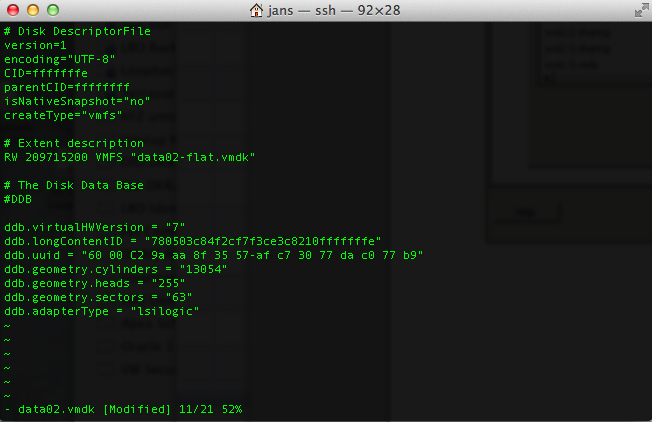
change the line following „# Extent description“ to reflect the new name of the flat file.
add hard disk to machine
set VMWare shared disk parameters
set the SCSI controller type to paravirtual
- select the virtual machine that was selected in the preceding step
- right-click the name of the virtual machine and select „Edit Settings“ to display the „Virtual Machine Properties“ pane
- in the device list, select the SCSI controller.
- in the „SCSI Bus Sharing“ section, select „None“, keeping the default selection.
- in the „SCSI Controller Type“ section, click „Change Type“.
- select „VMware Paravirtual“.
- click „OK“, and click „OK“ again.
add configuration parameters to the virtual machines
- in vSphere Client, select a virtual machine
- right-click the name of the virtual machine and select E“dit Settings“ to display the „Virtual Machine Properties“ pane
- click the „Options“ tab, click „Advanced“, and click „General“
- click „Configuration Parameters“
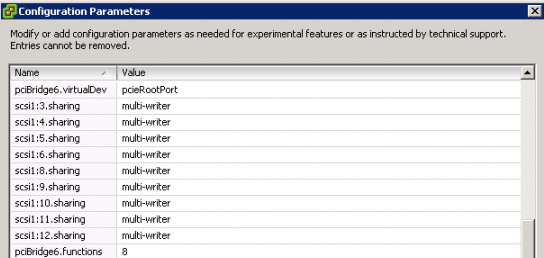
- on the „Configuration Parameters“ page, add rows and entries for the shared disks in the virtual machine’s configuration parameters:
- set „multi-writer“
- repeat steps 1 through 5 for each of the remaining virtual machines
Install guest OS
- attach CDROM
-
install guest OS