Upgrade Oracle Database 10g to 11g walkthrough in detail, by upgrade paths
Contents
*/]]>
In-place migration using Database Upgrade Assistant
In any standard cases, live migration with DBUA is recommended.
Prerequisites and checks
To be checked well in advance to the migration date.
Check time zone
SQL> SELECT version FROM v$timezone_file;
Caution with source databases version < 10.2.0.4
Check for Streams errors
SQL> SELECT count (*) from dba_apply_error;
Check for Archive Log Mode
SQL> archive log list
SQL> show parameter log
Check free space
$ df -h (Solaris)
$ bdf (HP-UX)
Check for backup in place
check with active backup mechanism
RMAN> list backups;
Check for enough space for additional cold backup during migration
SQL> select TRUNC (sum(bytes)/1e9+1) db_size from dba_data_files;
Check for internal / evil parameters
SQL> SELECT (translate(value,chr(13)||chr(10),‘ ‚)) FROM sys.v$parameter2 WHERE UPPER(name) =’EVENT‘ AND isdefault=’FALSE‘;
SQL> SELECT (translate(value,chr(13)||chr(10),‘ ‚)) from sys.v$parameter2 WHERE UPPER(name) = ‚_TRACE_EVENTS‘ AND isdefault=’FALSE‘;
Investigate necessarity of network connections
Are there any network connections to be initiated from within the database ?
With DB 11g, network ACLs (access control lists) have been introduced.
Network connections and usage of certain packages like UTL_SMTP or UTL_TCP are restricted ba ACLS. If these are present in the 10g source databasem the ACLs have to be defined.
For example: connections to an external mail server.
Pre-Migration steps
To be performed during the migration date.
Get AWR report
Get an AWR report of, say, the last two weeks, to have performance related numbers in case a comparison is necessary after the upgrade.
SQL> @?/rdbms/admin/awrrpt
Adjust SYSTEM ans SYSAUX tablespaces
Have at least 256MB available on SYSTEM ans SYSAUX tablespaces.
SQL> select file_id, file_name, bytes/1024/1024 from dba_data_files where tablespace_name like ‚SYS___‘;
SQL> alter database datafile 1 resize 750M;
SQL> alter database datafile 3 resize 750M;
Or, in case of ASM:
SQL> alter tablespace SYSAUX add datafile size 2G;
Adjust memory-related parameters
Both SGA_TARGET and SGA_MAX_SIZE are recommended to have 750M as target size, usually.
SQL> show sga
SQL> alter system set sga_max_size=768M scope=spfile;
SQL> alter system set sga_target=750M scope=spfile;
In case DBUA crashes with error „sga_target is bigger then sga_max_size“, it has been useful to set SGA_MAX_SIZE bigger, like 1G, disregarding the meaning of the error message…
Adjust JAVA_POOL_SIZE and Sharted Pool Size:
SQL> show parameter _pool_size
SQL> alter system set shared_pool_size=250M scope=spfile;
SQL> alter system set java_pool_size=250M scope=spfile;
Preparation for RAC migration
Parameters for RAC
If migration a Real Application Cluster database, make sure the parameter „cluster_database“ is set when migrating via DBUA.
SQL> show parameter cluster
NAME TYPE VALUE
------------------------------------ ----------- -----
cluster_database boolean TRUE
SGA should at least be 1600MB.
SQL> show sga
Total System Global Area 838860800 bytes
Fixed Size 2055824 bytes
Variable Size 473956720 bytes
Database Buffers 348127232 bytes
Redo Buffers 14721024 bytes
Parameter Files
Create a spare pfile.
SQL> create pfile=’/tmp/initOPS.ora‘ from spfile;
File created.
Make sure there is a parameter file in $ORACLE_HOME/dbs, which is pointing to, if possible, the spfile inside ASM.
$ cat /oracle/dbsystem/product/rdbms/10.2_1/dbs/initops1.ora
SPFILE=’+DATA01/ops/parameterfile/spfileops.ora‘
Additional backups
Take an additional backup of the oratab.
Save the output of:
srvctl status service –d <DB_NAME>
srvctl config database –d <DB_NAME>
srvctl status database -d <DB_NAME>
Set environment
Unset the Oracle environment
unset ORAHOME_ASM
unset ORACLE_HOME
unset LD_LIBRARY_PATH
unset ORAHOME_CRS
unset ORA_CRS_HOME
unset CRS_HOME
unset ORACLE_SID
unset RDBMS_HOME
Check for dependencies to ACLs
OWNER
——————————
ORACLE_OCM
OWF_MGR
WKSYS
For these schemas, network ACLs may have to be created after the upgrade.
Purge Recycle Bin
SQL> PURGE DBA_RECYCLEBIN;
Recompile invalid objects
SQL> @?/rdbms/admin/utlrp
Create dictionay statistics
In Oracle 10g:
SQL> EXECUTE dbms_stats.gather_dictionary_stats
In Oracle 9i:
dbms_stats.gather_schema_stats
(userschema => ‚SYS‘,
options => ‚GATHER‘,
estimate_percent => DBMS_STATS.AUTO_SAMPLE_SIZE,
method_opt => ‚FOR ALL COLUMNS SIZE AUTO‘,
cascade => TRUE);
END;
SQL> /
Restart DB
Restart the database to make to parameter changes active.
You max cross-check you are connect to the correct database before:
SQL> select count(*) from v$session;
COUNT(*)
———-
23
SQL> select * from global_name;
GLOBAL_NAME
————————————–
OPS.LOOPBACK.ORG
SQL> select version from v$instance;
VERSION
—————–
10.2.0.5.0
To restart a single instance database:
SQL> shutdown immediate
SQL> startup
To restart a RAC database:
srvctl status database –d <DB_NAME>
srvctl stop database –d <DB_NAME>
srvctl start database –d <DB_NAME>
Run Pre Upgrade script
Run Pre-Upgrade-Script from Ortacle 11g home.
SQL> @/oracle/dbsystem/product/11.2_3/rdbms/admin/utlu112i.sql
Analyse the output.
Most of the tips told here have already been taken care of.
Stuff like:
**********************************************************************
Obsolete/Deprecated Parameters: Update Oracle Database 11.2 init.ora or spfile
**********************************************************************
–> background_dump_dest 11.1 DEPRECATED replaced by „diagnostic_dest“
–> user_dump_dest 11.1 DEPRECATED replaced by „diagnostic_dest“
will be taken care of later by the Upgrade Assistant.
Take care when Underscore Parameters are found, i.e.:
„Oracle recommends removing all hidden parameters prior to upgrading.“
SQL> alter system reset „_evil=full“ scope=spfile sid=’*‘;
Note invalid objects
Take a note of still invalid objects for later reference.
SQL> spool invalid_objects_10g.log;
SQL> select * from dba_objects where status=’INVALID‘;
SQL> select comp_name, version, status from dba_registry;
Check for periodic OS jobs
Check for UNIX jobs ruinning and affecting the database, and un-schedule them.
$ crontab -l | grep -i $ORACLE_SID
Create a directory for cold backup
Create a directory for the cold backup the Upgrade Assistant will perform later.
$ mkdir /$USER/oradata3/“$ORACLE_SID“_upgrade11
Miscallenous
Drop some synonyms which trigger certain bugs:
SQL> drop public synonym ‚XMLCONCAT‘;
If this sysnonym was present, also issue:
SQL> alter package DBMS_SQLTUNE_INTERNAL compile body;
see also: MOS note: 1271490.1
Set 11g Oracle Home
Make sure you are connected with X11 forwarding / tunneling.
orcl1$ xlogo &
DBUA Migration steps
Run DBUA
/oracle/dbsystem/product/11.2_3/bin/dbua
$ dbua
If the tools do not start with Java Null Pointer Exception, try setting ulimit.
See Java Null Pointer Exception.
Select database to migrate
Ignore the invalid objects warning
The messages shown should correspond to the results we got earlier in the pre-migration phase.
Select upgrade options
Do not necessarily select the most extensive degree of parallelism.
You can turn off archiving during upgrade to gain performance, since the database is backued up just before the upgrdae.
But do not do this if Streams is using in DB.
Do upgrade the timezone thing.
Backup the database and select the directory you create before.
Move Database Files
Decide on wether you want to migrate data to ASM.
Recovery and Diagnostic Locations
Decide on wether you want to introduce a Fast Recovery Area (FRA), which is recommended.
Management Options
Decide on wether to configure Database Control (aka Enterprise Manager), or let your database join Grid Control, which is recommended in case you do have an installation.
Network configuration
Decide wether you want to register the database to any directory (if you have one), and which Listeners you want to be configured automatically.
You can configure the Listeners later, manually.
In this case, select the Listeners tab and select „Register the database with selected listeners only“ and do not select any listeners.
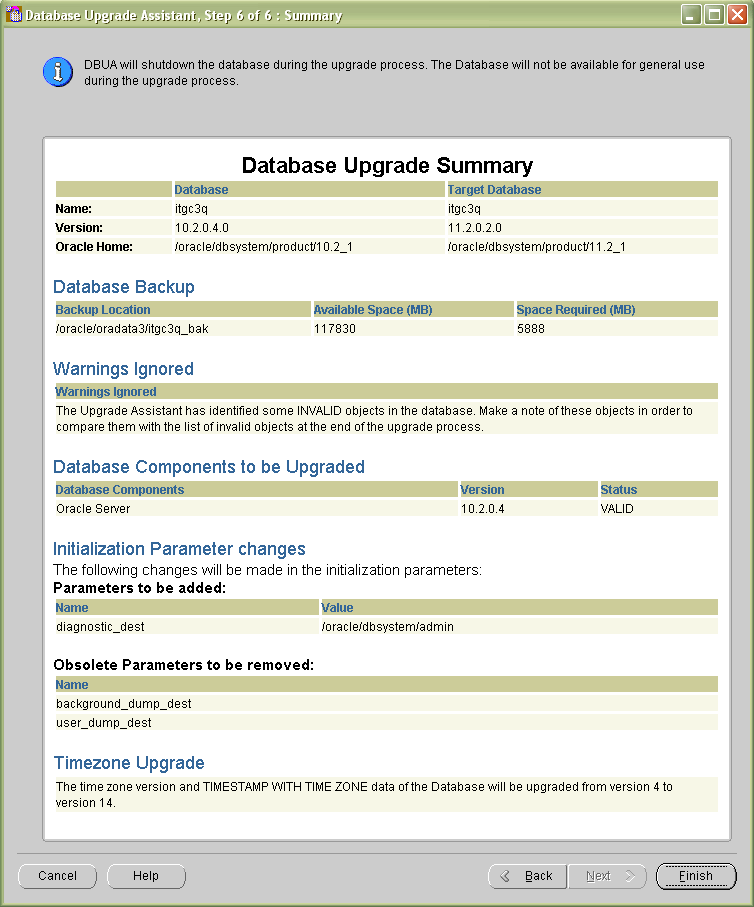
Review the summary
Review the summary page and Finish the upgrade.
Errors doring DBUA run
IDENTIFIER SYS.DBMS_JAVA MUST BE DECLARED
11GR2 DBUA ORA-06550 PLS-00201 IDENTIFIER SYS.DBMS_JAVA MUST BE DECLARED
See MOS note: ID 1066828.1
When upgrading from 10.2.0.4 to 11.2.0.1, the following error is returned:
ORA-06550: line 1, column 7
PLS-00201: identifier SYS.DBMS_JAVA must be declared
ORA-06550: line 1, column 7
PL/SQL: Statement ignored
Cause: Bug 9315778 – DBUPGRADE: ORA-06550 SYS.DBMS_JAVA NOT DECLARED
Ignore the error if the upgrade is still running or completed, or install patch 9315778 before running the upgrade
sga_target is bigger then sga_max_size
Restore the backup with DBUA, set SGA_MAX_SIZE way bigger then SGA_TARGET and retry DBUA.
Review the Results
Review the DBUA Upgrade Results page and Close DBUA.
Post-Upgrade
Review Oratab
Review the entry in Oratab (/etc/oratab or /var/opt/oratab) DBUA has created, and check it reflects the correct settings regarding autostart und Oracle Home.
Post Upgrade Script
Login with a fresh shell and review your Unix environment is set correct.
Run Sqlplus and see everything looks correct.
Run the Post Upgrade Script:
Oracle Database 11.2 Post-Upgrade Status Tool 02-15-2012 16:14:17
Component Current Version Elapsed Time
Name Status Number HH:MM:SS
Oracle Server VALID 11.2.0.3.0 00:14:46
Gathering Statistics 00:01:05
Total Upgrade Time: 00:15:52
PL/SQL procedure successfully completed.
Check Objects
Recompile any invalid objects again.
SQL> select * from dba_objects where status=’INVALID‘;
SQL> @?/rdbms/admin/utlrp
Compare invalid objects with list created pre upgrade.
Check SPFile
Make sure:
- an initSID.ora exists in $ORACLE_HOME/dbs
- it points to the location of SPFile
- an SPFile exists (in /dbs or ASM)
Configure Listener
Check Listener registration DBUA performed, or create them manually if you skipped DBUA Listener configuration.
Check which listeners are running:
oracle ~$ ps -ef | grep lsnrctl
Use the name of your listener.
Sometimes, the Listener refuses to add a new entry without complanining.
Stop and start the Listener in these cases.
If you have different Listeners for 10g and 11g installations on your machine, you have to reload both listeners.
Directory registration
Review the directory registration DBUA did, if you configured it do do any.
Optionally, register the database with OID manually using netmgr.
In netmgr, numeric keys and backspace key do not work. ![]()
Pay special attntion the correct port is listed.
Configure parameters
Restart the database to get the SPFile right:
SQL> shutdown immediate
SQL> startup
Set COMPATIBLE parameter, and verify wether LOCAL_LISTENER is needed.
SQL> alter system set compatible=’11.2.0′ scope=spfile;
SQL> alter system reset local_listener scope=spfile; (optinal)
Use srvctl in case of RAC.
LOCAL_LISTENER may not be needed if Data Guard is not in place.
From the moment you set COMPATIBLE to 11.x no downgrade is possible any more.
It is possible to let COMPATIBLE be 10.x for test purposes.
Default Profile
Verify the Default Profile is set accoding to your local policies.
Create any 11g Profiles you might have in your enterprise for security purposes, like e.g. password verification.
CPU_PER_SESSION UNLIMITED CPU_PER_CALL UNLIMITED
CONNECT_TIME UNLIMITED IDLE_TIME UNLIMITED
LOGICAL_READS_PER_SESSION UNLIMITED
LOGICAL_READS_PER_CALL UNLIMITED
COMPOSITE_LIMIT UNLIMITED PRIVATE_SGA UNLIMITED
FAILED_LOGIN_ATTEMPTS 10 PASSWORD_LIFE_TIME 180
PASSWORD_REUSE_TIME UNLIMITED PASSWORD_REUSE_MAX UNLIMITED
PASSWORD_LOCK_TIME 1 PASSWORD_GRACE_TIME 28
PASSWORD_VERIFY_FUNCTION NULL;
You may optionally reset all accounts to have a fresh starting point in time for password aging:
SQL> select ‚ALTER USER ‚||u.name||‘ IDENTIFIED BY VALUES ||u.password||;‘
from user$ u, dba_users d
where d.username = u.name
and d.account_status = ‚OPEN‘ and d.lock_date is null
and d.profile = ‚DEFAULT‘ and d.expiry_date is not null;
Fixed Table Stats
Renew Fixewd Table Statistics:
SQL> execute dbms_stats.gather_fixed_objects_stats;
TNS
Verify chnaged done by DBUA to local TNS configuration or edit TNSNames configuration manually.
$ vi $TNS_ADMIN/tnsnames.ora
Unix
If you disabled any external (cron-) jobs during migration, you may no re-enable them now.
Network ACLS
Setup any Network ACLs, if defined.
DBMS_NETWORK_ACL_ADMIN.CREATE_ACL(acl => ‚ippst.xml‘,
description => ‚Permission for IPPS_STAMM user‘,
principal => ‚IPPS_STAMM‘,
is_grant => true,
privilege => ‚connect‘,
start_date => null,
end_date => null);
commit;
END;
/
BEGIN
DBMS_NETWORK_ACL_ADMIN.ADD_PRIVILEGE(acl => ‚ippst.xml‘,
principal => ‚IPPS_STAMM‘,
is_grant => true,
privilege => ‚resolve‘);
commit;
END;
/
BEGIN
DBMS_NETWORK_ACL_ADMIN.ASSIGN_ACL(acl => ‚ippst.xml‘,
host => ‚mailgate.xyz.com‘,
lower_port => null,
upper_port => null);
commit;
END;
/
Check availability
Perform a last general check through all layes of configuration.
$ tnsping OPS
 TNS Ping Utility for HPUX: Version 11.2.0.2.0 - Production on 25-NOV-2011 12:51:36
 Copyright (c) 1997, 2010, Oracle. All rights reserved.
 Used parameter files:
 /oracle/dbsystem/product/11.2_2/network/admin/sqlnet.ora
 Used TNSNAMES adapter to resolve the alias
 Attempting to contact (DESCRIPTION = (ADDRESS_LIST = (ADDRESS = (PROTOCOL = TCP)(HOST = orcl1)(PORT =
 1550))) (CONNECT_DATA = (SERVER = DEDICATED) (SERVICE_NAME = ops.loopback.org)) ) OK (10 msec)
$ sqlplus scott/tiger@OPS
SQL*Plus: Release 11.2.0.2.0 Production on Fri Nov 25 12:49:41 2011
 Copyright (c) 1982, 2010, Oracle. All rights reserved.
 ERROR:
 ORA-01017: invalid username/password; logon denied
 SP2-0157: unable to CONNECT to ORACLE after 3 attempts, exiting SQL*Plus
Data Pump
I the new 11g database system can be build in parallel on separate hardware, Export / Import (via Data Pump) is a possible migration scenario.
It is very helpful for the scenario to have proper create scripts for the database schemas and objects.
Tablespaces and Schemata are recommended to be created before any import is done.
Is is alos possible to do a full database import from Oracle 10g to 11g, but this is not recommended, since SYS objects are often also imported accidentially.
Create new target database
Install Software
Install new 11g database software home and install a new Custom database using custom scripts or DBCA.
Create tablespaces in target database
Create Tablepspaces as in source database.
See Generate Create Tablespace DDL.
See Free.sql also to control available space.
Create Data Pump directory
SQL> select ‚CREATE DIRECTORY ‚ || directory_name || ‚ as || directory_path ||*;‘
from dba_directories
where user = ‚SYS‘
and directory_name not in (‚DATA_PUMP_DIR‘, ‚ORACLE_OCM_CONFIG_DIR‘);
Compare database parameters
Generate a pfile from both databases and compare.
SQL> create pfile=’/tmp/db1.ora‘ from spfile;
SQL> create pfile=’/tmp/db2.ora‘ from spfile;
$ diff /tmp/db1.ora /tmp/db2.ora
Especially investigate on parameters
- All „_size“ – Parameters
- cursor_sharing
- db_domain
- db_files
- dbwr_io_slaves
- dml_locks
- fast_start_mttr_target
- fast_start_parallel_rollback
Global Names has consequences on the way database links are resolved.
If you get ORA-02085 after migration, try resetting this parameter.
- instance_name
- job_queue_processes
- log_buffer
- log_checkpoint_interval
- max_dump_file_size
- nls_date_format
- nls_length_semantics
- open_cursors
- open_links
- optimizer_index_caching
- optimizer_index_cost_adj
- os_authent_prefix
- pga_aggregate_target
- pre_page_sga
- processes
- query_rewrite_enabled
- session_max_open_files
- sga_target
- star_transformation_enabled
- tape_asynch_io
- timed_statistics
- undo_retention
- undo_tablespace
In many cases, these parameters have to be reset:
SQL> alter system reset control_file_record_keep_time scope=spfile;
SQL> alter system reset cpu_count scope=spfile;
SQL> alter system reset global_names scope=spfile;
SQL> alter system reset O7_DICTIONARY_ACCESSIBILITY scope=spfile;
SQL> alter system reset remote_os_authent scope=spfile
Export data
Create Export Directory
SQL> create directory OPS_MIG as ‚/tank/spool/opsmis‘;
Create Data Pump Parameter File
$ cat ops.par
full=y
parallel=1
dumpfile=<sid>_migration.dmp
directory=OPS_MIG
logfile=<sid>_migration.log
FLASHBACK_TIME=“TO_TIMESTAMP(TO_CHAR(SYSDATE,’YYYYMMDD HH24MISS‘),’YYYYMMDD HH24MISS‘)“
Restart Source database
Restart Sorce database in Restricted Mode to prevent users from logging in if schedules and possible.
SQL> shutdown immediate;
SQL> startup restrict
In RAC environments, use srvctl to shutdown all nodes, of course.
$ srvctl stop database -d OPS
$ sqlpus „/ AS SYSDBA“
SQL> startup restrict
Export & Transport
Start Export
$ expdp „/ AS SYSDBA“ parfile=ops.par
You can schedule this with „at“, but take care of the environment.
Move Dump File
Move the dump file to the new system, using scp or ftp or cp.
Import
Import Data
$ vi ops-imp.par
parallel=1
full=y
#schemas=<user>
dumpfile=<sid>_migration.dmp
directory=OPS_MIG
logfile=<sid>_migration.log
$ impdp „/ AS SYSDBA“ parfile=ops-imp.par
Aftermath
Check Database Links
Compare and check all database links.
Check for all TNS configuration entries on the source DB being necessary for database links on target DB.
Crontab Jobs
Transfer all external Jobs and Programs necessary to the new system.
Schemas & Objects
Check wether all users and schemas have been transfered.
Compare all objects and there validity.
SQL> select count(*) from dba_objects;
SQL> select count(*) from dba_objects where status = 'INVALID';
Check private and public synonyms.
Compare grants.
Data Guard
This is the preferred scenario for upgrades in HA-environments where parallel build of the 11g system is possible hardware-wise and downtime shall be minimal.